Let’s Talk Tech.
Accordion’s “Talking Tech” series explores how different CFO Technology solutions can empower finance functions to support organizational strategic initiatives – by implementing business process recommendations, optimizing operations, and capitalizing on value creation opportunities.
Now, let’s take a look at Oracle in the context of streamlining data using SmartPush.
Smart Push is one of the cornerstone features of Oracle Planning Cloud which allows users the ability to quickly and easily integrate data from one cube to another within the same application. Moving data between cubes in an application is a common requirement in Planning Applications. This might be moving data from a calculation engine to a reporting cube, or between cubes with different use cases – such as pushing data from a Workforce planning cube to a P&L planning cube. While this might sound simple, Smart Push is actually a huge benefit to users and replaces the old on-premise methodology of creating integrations via a verity of methods including using Oracle Data Integrator (ODI), Calcs Scripts, or FDMEE. These processes, while ultimately providing the desired result, are each unique and time consuming to set up. What used to be a tedious process via a legacy method, is now accomplished with ease by using Smart Push. By completing a series of simple steps, Smart Push can easily be configured and implemented by both seasoned and rookie developers and users alike.
Amazing, right!?
In this blog, our goal is to a walk you through the steps of creating and using a Smart Push integration in Oracle Planning Cloud. In the following example, we will create an integration between an BSO cube, used to input plan data and calculate allocations, to a Reporting (ASO) cube, which aggregates the data on the fly for total company reporting. It is important to note that Smart Push is most effective when integrating data between similar cubes. Cubes with large differences in dimensionality or members may be better served via different methods. This is a very common use case for a Smart Push integration, where calculations are typically completed in a BSO cube and later reported on by utilizing the ASO cube. In this instance, Smart Push is an ideal solution.
For this example, the sample application has the following characteristics:
Application cubes
CEEInp: BSO cube that is the source
CEEWFP: ASO cube that is the target
Application dimensions
5 standard dimensions – Account, Period, Scenario, Version, Years
4 custom dimensions – Department, Employees, Entity, Position
Dimensions are shared between the cubes
Getting started
The first step is to access the hamburger menu in the upper left corner of the application homepage and select Data Exchange.

Next, select Data Maps from the upper left corner of the Data Exchange Menu and select Create.

Please note: As mentioned above, the dimensions are shared amongst the 2 cubes. Due to the shared dimensionality, the mapping process becomes a simple pick of which members you wish to transfer or push from the source to the target. There is no need to map each member because the application understands it is a one-for-one mapping.
In a scenario where dimensionality is not shared, a more in-depth selection process takes place where you select the desire source member and where those members should target (or if they should be ignored). Whether dimensionality is shared or not, mapping remains relatively simple and requires the user to define where a given source intersection lives in the target.
Select members for mapping
A menu will launch asking for 2 inputs:
- Source and Target cube
- Which members you wish to have the ability to copy
To configure the source and target cubes, simply select the application from the drop down. In this case, CEEINP is the source cube, and CEEWRP has been chosen as the target application.
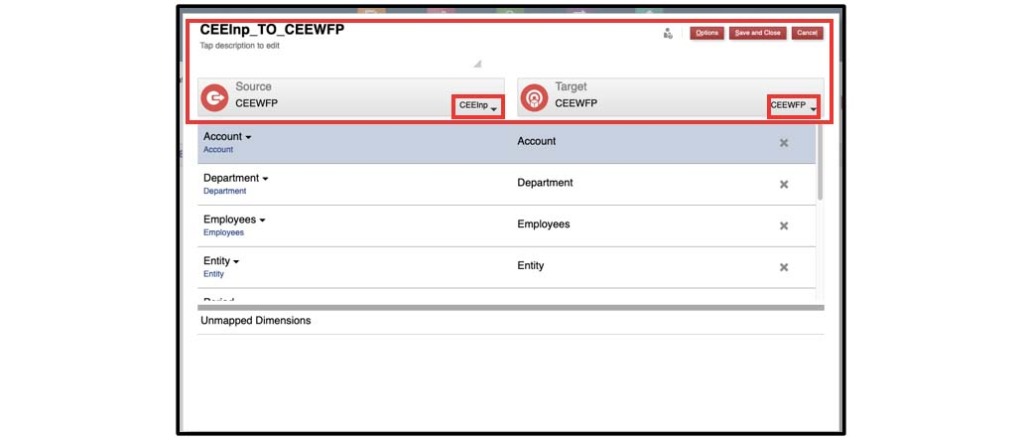
Next, select each member for a given dimension you wish to push. To make a selection, click the blue hyperlink found under each dimension name.
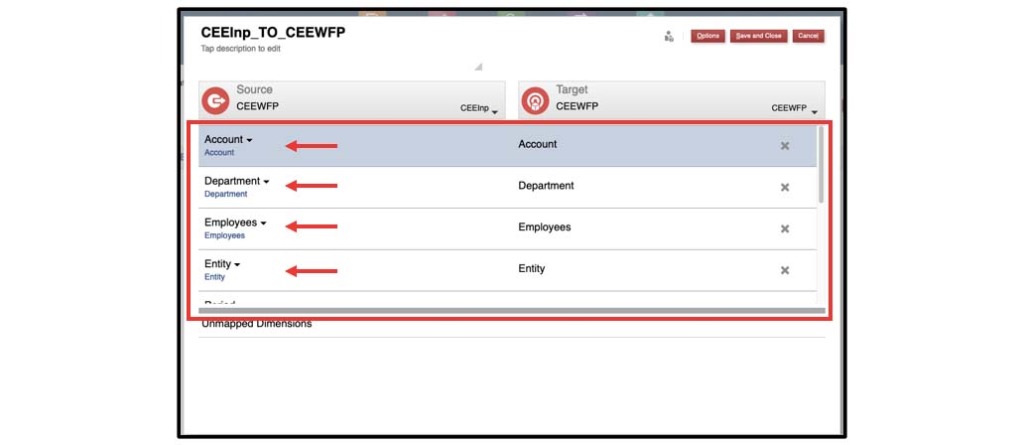
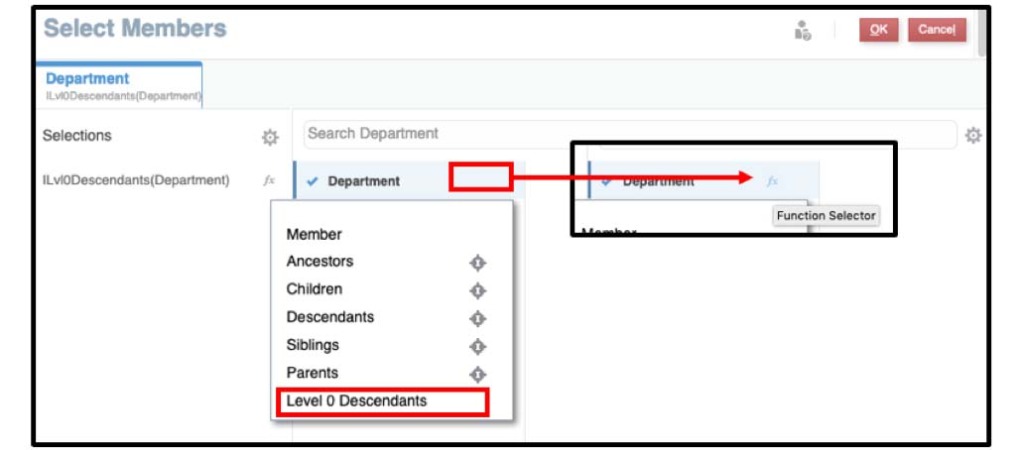
The member selection menu can be seen below. For this example, we will select all base members for the Department dimension. By selecting all members, the integration will push all data found in the BSO cube and copy it over to the same member in the ASO cube.
Smart Push uses the same function capabilities as the rest of Planning Cloud to easily make large member selections, such as Level 0 Descendants, very simple.
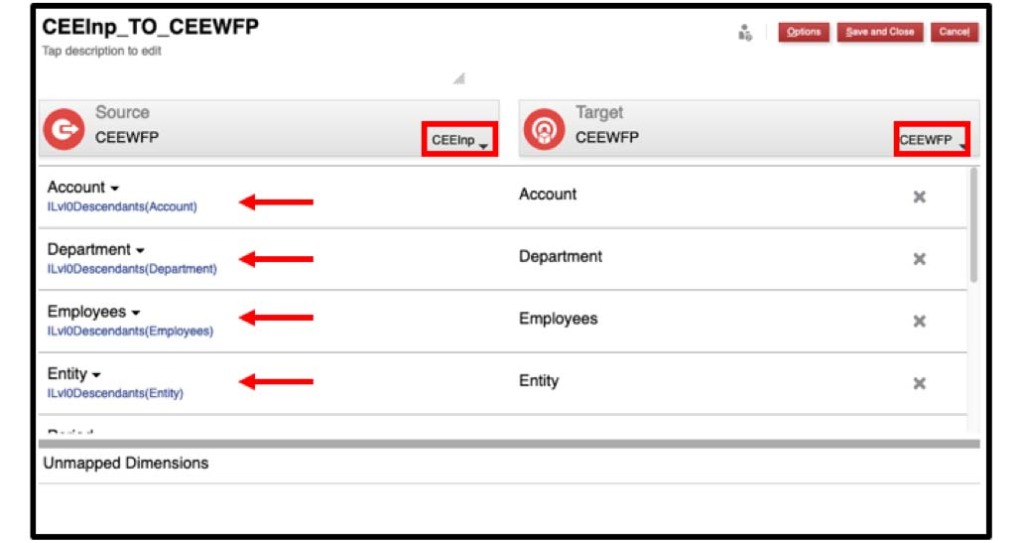
This process will be completed for each dimension. Please note, each Smart Push Integration can be further tailored later in the process when attached to an artifact, such as a form. By tailoring Smart Push integrations to only push necessary intersections, performance can be greatly improved.
After each dimension is addressed, a final result can be seen below.
Select Save and Close. The integration is now seen in the Data Maps Menu.

With the Data Map completed, the integration can be used immediately with no need for additional setup, if desired. To execute the Data Map as is, click the ellipses to the far right of the Data Maps menu. By doing so, the application will copy all data found at the member intersections defined in the previous step.

Attaching Smart Push to a form
Smart Push becomes even more useful when paired with a data form to activate the integration. Planning Cloud you to attach a Data Map to a data form, allowing end users to activate the integration in the background for a more seamless planning process. To create a Smart Push on a form:
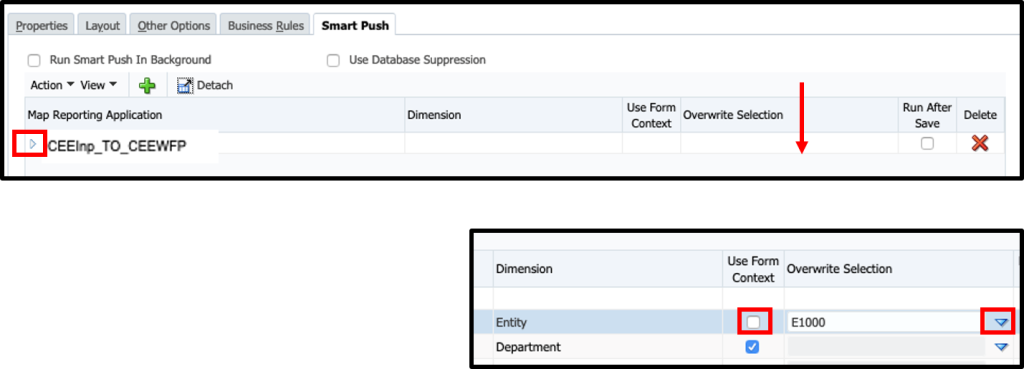
- Access the Smart Push tab located in the form’s setup menu
- Select the green + to assign the Smart Push to the form
- Choose the appropriate integration
- Press OK and Save Changes

Once attached, an array of options can be selected to instruct the integrations on how to properly run within the form process. These items, mostly self-explanatory, include – Run Smart Push in Background, Use Data Suppression, and Run After Save.

Once the Smart Push has been attached to a respective form, it will execute whenever that data form is opened (or saved, depending on the options configuration). By default, Smart Push will always push data that aligns with form context. For example, if the form includes 5 accounts and 2 entities, those are the only intersections that will be pushed to the target cube. However, Smart Push can be overwritten to only receive specific target information by using the Overwrite Selection process found by pressing the arrow to the left of the integration name. Once the menu is opened, uncheck Use Form Context and select the members you want to push data from by using the down arrow to access the members selection menu. This will further refine the data exchange and limit the scope of the data exchange within that dimension. In this example, the Smart Push will limit the data to Entity E1000. A common use case for this would be if a user inputs data to an intersection on the form, but calculations run to move that data into an intersection not represented on the form (i.e. allocating expenses that were input to the department level).
That’s it! You have now created your first Smart Push on a form in Oracle Planning Cloud!
This simple example of a Smart Push highlights the power of the new features and enhancements that have been built into Oracle Planning Cloud. With Oracle putting all of its new development efforts into the cloud suite, rather than the on-premise products, it gives yet another reason to make the move to Oracle Cloud.