The step-by-step NetSuite MCP setup guide for Claude AI
This guide walks you through setting up the NetSuite Model Context Protocol (MCP) integration with Claude AI, enabling you to interact with your NetSuite data using natural language conversations and perform tasks such as creating records, running queries, and accessing NetSuite data directly through Claude AI.
Prerequisites
Before starting the setup process, ensure you have:
NetSuite requirements
- NetSuite account: Administrative access to your NetSuite environment
- Integration features enabled: NetSuite requires specific features to be enabled for OAuth and SuiteTalk functionality. You must enable REST Web Services and OAuth 2.0 authentication
To enable these features:
-
- In NetSuite, go to Setup → Company → Enable Features
- Click the SuiteCloud subtab
- In the SuiteTalk (Web Services) section, check REST Web Services
- In the Manage Authentication section, check OAuth 2.0
- Click Save
Claude AI requirements
- Claude AI Pro subscription: Required to use custom connectors and MCP functionality
- Why Claude AI: Claude AI is the superior choice for this integration because:
-
- No Usage Billing: Unlike other LLMs, Claude doesn’t charge based on token usage for MCP interactions
- Strict Data Privacy: Anthropic has stringent data privacy practices with 30-day default retention and explicit user consent requirements for data training
- Optimal MCP Support: Built specifically to work seamlessly with Model Context Protocol
Part 1: Installing MCP tools in NetSuite
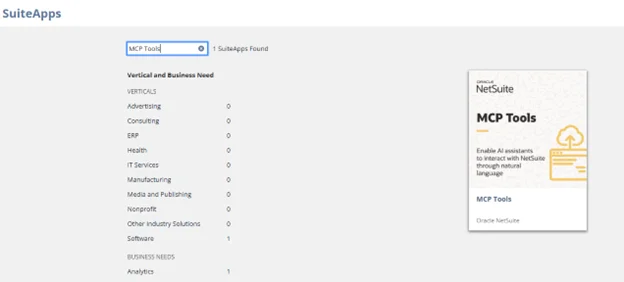
Step 1: Access SuiteApp Marketplace
- Log in to your NetSuite account
- Navigate to Customization → SuiteCloud Development → SuiteApp Marketplace
- In the Search SuiteApps field, enter: MCP Tools
- Click the MCP Tools icon in the search results
Step 2: Install MCP Tools
- On the SuiteApp details page, click Install (located in the top right)
- Follow the installation prompts
- Wait for the installation to complete
** Important: If the installation fails, the MCP client will show an empty list of tools when you try to connect from Claude AI.
Part 2: Creating a custom role for MCP integration
Why a custom role is required
Critical security note: Administrators are not allowed to work directly with MCP for security reasons. A custom role ensures:
- Proper permission management and security
- Controlled access to NetSuite features through the AI integration
- Compliance with NetSuite’s security framework
Step 1: Create the custom role
- In NetSuite, go to Setup → Users/Roles → Manage Roles
- Click New to create a new role
- Give your role a descriptive name (e.g., “MCP AI Integration User”)
Step 2: Assign Required Setup Permissions
Navigate to the Setup subtab of the Role record and assign Full level permissions for:
Minimum Required Permissions:
- Log in using OAuth 2.0 Access Tokens
- MCP Server Connection
- OAuth 2.0 Authorized Applications Management
These three permissions are the absolute minimum required to establish the MCP connection.
Step 3: Assign functional permissions
Based on your intended use cases, add permissions for the data and records you want to access through Claude AI:
Common permissions to consider:
- Transactions: For creating sales orders, invoices, payments, etc.
- Lists: For managing customer, vendor, item, and other list records
- Reports: For running and accessing reports
- Custom Records: If you plan to work with custom record types
- SuiteQL: For advanced querying capabilities
Permission strategy: The MCP server can run SuiteQL queries out of the box, but you must provide record-level permissions for the integration to query specific record types. Without proper permissions, functionality will be severely limited.
Step 4: Assign Role to Users
- Save the custom role
- Assign this role to users who will work with the MCP integration
- Ensure users have this role active when using the integration

Part 3: Connecting Claude AI to NetSuite
Step 1: Access Claude AI Settings
- Go to https://claude.ai/
- Ensure you have a Pro subscription active
- Click on your Profile (usually in the top right)
- Select Settings from the dropdown menu
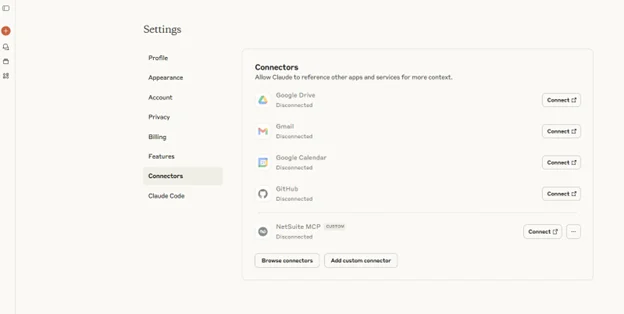
Step 2: Add custom connector
- In Settings, look for Add Custom Connector option
- Click to add a new connector
Step 3: Configure connection details
Name: Enter a descriptive name for your connector
- Example: “NetSuite Production” or “NetSuite – [Company Name]”
- You can include an identifier to distinguish multiple NetSuite environments
URL: Enter your NetSuite MCP endpoint URL using this format:
https://<account_id>.suitetalk.api.netsuite.com/services/mcp/v1/all
Finding your Account ID: Your account ID is typically visible in your NetSuite URL when logged in, or can be found in Setup → Company → Company Information.
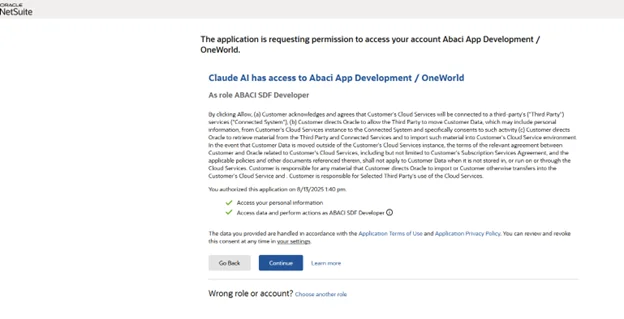
Step 4: Establish connection
- Click Connect
- You’ll be redirected to NetSuite for OAuth authentication
- Log in with credentials that have the custom MCP role assigned
- Adjust role: If you have multiple roles, ensure you select the custom MCP role you created
- Click Allow to authorize the connection
- You should see a success response confirming the connection
Step 5: Verify Integration
- An automatic integration record will be created in NetSuite
- To view it, go to Setup → Integrations → Manage Integrations
- You should see a new integration record for your Claude AI connection
Part 4: Using the NetSuite MCP Integration
Available Tools
Once connected, you’ll have access to various tools based on your role permissions. The available tools include:
- Record management: Create, read, update, and delete records
- SuiteQL queries: Advanced querying of NetSuite data
- Transaction processing: Handle sales orders, invoices, payments, etc.
- Reporting: Access and generate reports
For a complete list of predefined tools, see NetSuite MCP tools documentation.
Sample Conversational Prompts
Here are examples of how to interact with NetSuite through Claude AI:
Creating records:
- “Create a new customer record for ABC Company with email contact@abccompany.com“
- “Add a new inventory item called ‘Widget Pro’ with SKU WGT-001”
Querying data:
- “Show me all open sales orders from this month”
- “What are our top 10 customers by total sales?”
- “Find all items with inventory below 50 units”
Reporting:
- “Generate a sales summary report for Q4”
- “Show me aged receivables for customers over 60 days”
Best practices
- Be specific: Provide clear, detailed instructions for better results
- Use natural language: The AI understands conversational requests
- Verify results: Always review the output, especially for critical business operations
- Test permissions: Start with read-only operations to ensure everything works correctly
Troubleshooting NetSuite MCP
Empty tools list
Problem: After connecting, Claude AI shows no available tools.
Root cause: This is almost always a permission issue.
Solutions:
- Verify the MCP Tools SuiteApp installed successfully
- Check that your user has the proper custom role assigned and active
- Ensure the role has the three required Setup permissions (OAuth 2.0 Access Tokens, MCP Server Connection, OAuth 2.0 Authorized Applications Management)
- Confirm you’re using the correct account ID in the URL
Limited functionality
Problem: Connected successfully but can only perform basic queries, not access specific records.
Root cause: Insufficient record-level permissions in the custom role.
Solutions:
- Review and expand the custom role permissions
- Add specific transaction, list, or record permissions as needed
- Remember: The role must include permissions for any records/features you want to access through Claude
Authentication failures
Problem: Unable to authenticate or connection fails.
Solutions:
- Verify your NetSuite account credentials
- Ensure your user account has the custom MCP role assigned and active
- Check that OAuth 2.0 permissions are set to “Full” in the role
- Confirm the account ID in the URL is correct
- Verify that OAuth 2.0 is enabled in your NetSuite instance
Integration not showing in NetSuite
Problem: No integration record appears in “Manage Integrations”.
Solutions:
- Refresh the Manage Integrations page
- Verify the connection was completed successfully in Claude AI
- Check that OAuth 2.0 Authorized Applications Management permission is enabled
Security considerations
Data privacy and LLM comparison
When connecting your NetSuite environment to an LLM, security and privacy are paramount. Here’s how the top 3 LLMs compare:
Claude AI (Anthropic) – Recommended
- Data training: By default, user data is not used for model training. Users must explicitly opt-in
- Data retention: 30-day default retention period, with user control over conversation deletion
- Privacy controls: Limited employee access with strict controls and encryption at rest and in transit
- Billing: No usage-based charges for MCP interactions
OpenAI ChatGPT
- Data training: Enterprise customers can opt out, but consumer data may be used for training unless explicitly opted out
- Data retention: Enterprise: Admin-controlled retention; Consumer: Varies by service type
- Privacy controls: Enterprise customers get stronger protections than consumer users
- Billing: Token-based usage charges can become expensive
Google Gemini
- Data training: Consumer data used for training by default, with human reviewers analyzing conversations
- Data retention: 18-month default retention, customizable to 3 or 36 months
- Privacy controls: Integrated with broader Google data ecosystem; complex privacy settings
- Billing: Usage-based pricing for enterprise features
Key security features
- Role-based access: The integration respects NetSuite’s role-based permission system
- OAuth 2.0: Secure authentication without sharing passwords
- Audit trail: All actions performed through the integration are logged in NetSuite
- Permission boundaries: The AI can only access data and perform actions allowed by the assigned role
- Encryption: All data transmission is encrypted using industry standards
Important security implications
** Critical considerations:
- Data exposure: Any data accessible through your NetSuite role can potentially be sent to the LLM
- Business logic: Sensitive business rules and calculations may be revealed through queries
- Competitive information: Sales data, pricing, and customer information will be accessible
- Compliance: Ensure your organization’s data governance policies allow external AI processing
Recommended safeguards:
- Use the most restrictive role permissions possible
- Start with read-only access and expand gradually
- Never include sensitive information in prompts
- Regularly audit integration usage through NetSuite logs
- Consider using Claude AI due to its superior privacy protections
Getting Help
- NetSuite MCP documentation: Custom tool creation guide
- Claude AI support: Available through your Claude AI account
- NetSuite support: For SuiteApp installation and role configuration issues
Next Steps
Once your integration is set up and working:
- Explore capabilities: Try different types of queries and operations
- Create custom tools: Consider developing custom tools for your specific business needs
- Train your team: Share this guide with team members who will use the integration
- Monitor usage: Keep track of how the integration is being used and optimize permissions accordingly
- Regular security reviews: Periodically audit the role permissions and integration usage
Privacy and security summary: This integration provides powerful natural language access to your NetSuite data. Claude AI offers the strongest privacy protections among major LLMs, with no default data training, strict access controls, and user-controlled retention periods. Still, always consider the sensitivity of your data and implement appropriate safeguards through careful role permission management.
Ready to explore how MCP can transform your NetSuite environment? Accordion specializes in implementing enterprise-grade MCP solutions with advanced Custom Tool Scripts optimization. Get in touch to discuss implementation strategies tailored to your organization’s specific needs and value creation goals.